In this article, I will learn how to create a new export template.Important note on Exports in Staffcloud:
In Staffcloud, every user with the appropriate permissions can create, configure, and use their own export templates. This is a unique strength of our system and unlocks powerful possibilities – from simple lists to complex, highly structured data exports.
Because exports in Staffcloud are very powerful but also technically complex, the related guides and tutorials are intentionally detailed and technical. Please take your time, be patient with yourself, and follow the step-by-step learning path across multiple articles that we have prepared to build up your knowledge in a structured and sustainable way.
To fully understand and correctly use exports in Staffcloud, we recommend working through the following solution articles in the given order and trying out the examples in parallel in your own instance:
- [WIP] Recommended settings in Staffcloud and on your device (Excel)
- Exporting Staffcloud-Data
- Creating Export Templates → you are here!
- Creating Export Templates: Column Configuration
- [WIP] Creating Export Templates: Search form Configuration
- Direct Exports: Using Embedded Export Templates
- Direct Exports: Configure an Embedded Export Template
You can also find a “construction guide” for frequently requested export templates in the following area: DIY Tutorials for frequently requested Export Templates
Creating a New Export Template in 9 Steps
1. In the "Export" Section, click “Add New Export” and Choose the Export Type
2. Getting Familiar with the Export Configuration
3. Add Required Fields from the Active Resource
4. Add Additional Resources via Resource Mapping
6. Reorder Columns if Required
7. Configure Columns & Filters (Search form)
- Column Configuration
- Create Filters (SEARCHABLE) in the Search form - More Meaningful and Faster Results
8. Preview Export & Save Template
Example Scenario
For easier understanding, the following example creates a simple export template that outputs:
- All planned assignments (assigned/confirmed)
- within the period 01.07.2025 – 31.07.2025 (please choose a fitting time period for your Export)
In addition to the planned start and end time, assignment status, and approval status, the export should also include the project, event, function, and the first and last names of the scheduled employees.
Try to recreate this export template in parallel while reading this article.
1. In the "Export" Section, click “Add New Export” and Choose the Export Type

For this example, the export type Assignments is selected, as the main filter criteria are the assignment date and assignment status. Click Continue to progress further.
Available Export Types:
- Master data export: Select one of the following export types if you want to export master data of Employees, External workers, or Clients without any assignment reference.
- If you want to export event-related information without assignment references, choose "Event".
- As soon as your export has an assignment reference, always select the "Assignments" type.
- Pay lines (payrun exports) and ERP exports require the corresponding add-on modules. The Customer Success Team will be happy to assist you if needed.
To use the export types External staff, Pay lines, or ERP export, the corresponding add-on modules are required.Many exports can be created in multiple ways. At this stage, already consider where your main filter criteria lie. If they are assignment-related, use the export type Assignments, as shown in this example.
2. Getting Familiar with the Export Configuration
You are now in the export configuration. Here you can customize your export template according to your needs. You can add data fields, reorder them, further configure them, or remove them entirely.

A) Fields – Left Area (All Available Data Fields)
On the left side, you will find all available data fields of the selected export type (in our example: Assignments) and all linked resources (for more information on linked resources, see step 4. Add Additional Resources via Resource Mapping)
B) Columns – Middle Area (Fields Added to the Template)
In the middle area, you see all currently added data fields. Each listed data field results in its own column in the export. The default naming of data fields is a combination of the resource (e.g. “Assignments”) and the field name (e.g. “Start time”).
For export templates of the type "Assignment", the fields (columns) "[Assignments] Status", "[Assignments] Start time", "[Assignments] End time" and "[Assignments] Approved" are preselected by default.
In this example, they are kept, but they could also be added via the available fields on the left or removed via the red minus icon.
C) Column Configuration
The right-hand area is reserved for advanced column and search field configuration and is currently empty. This area only appears when you click on a data field added in the middle area (see step 7. Configure Columns & Filters (Search form))
3. Add Required Fields from the Active Resource
Based on the export type selected in step 1, one database (= resource) is always preselected. Via the available available fields on the left, you can see all data fields contained in this resource. You can scroll through the list or use the search field at the top to find the desired data field.
You add a data field to your export template by clicking on it on the left side. From that moment on, it is shown in grey in the available fields list and is listed in the middle area under "Columns".
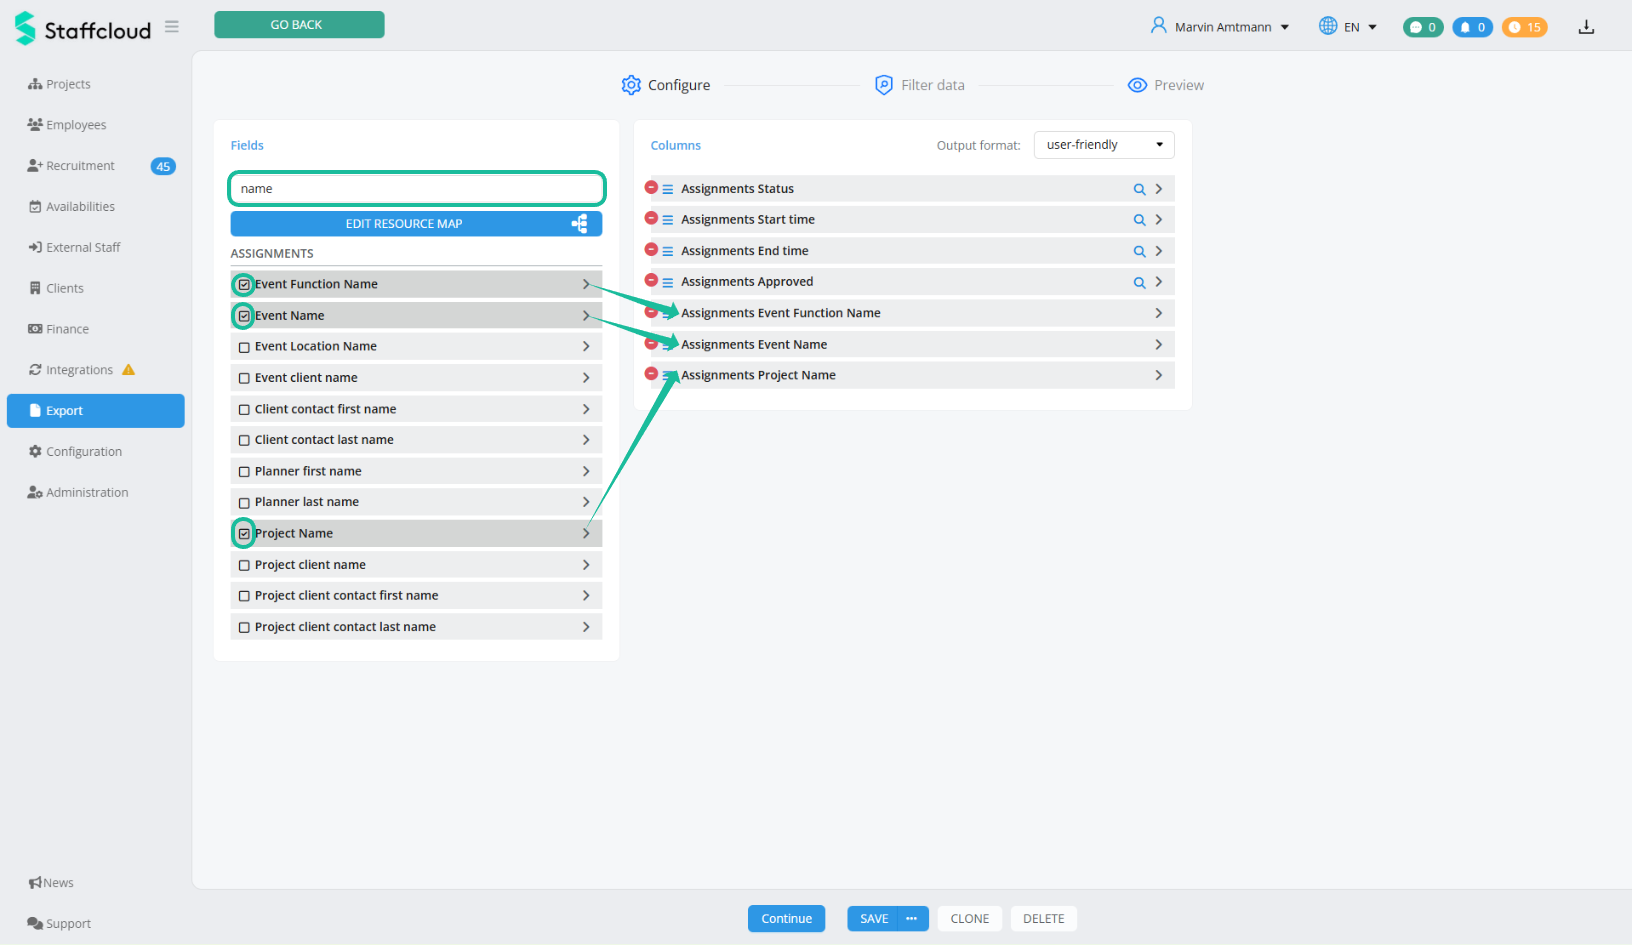
In this example, the preselected resource is "Assignments" (because we selected the export type "Assignments"). Within the Assignments resource, you will also find Project Name, Event Name and Event Function Name (e.g. bartender). Search for these fields using the search field at the top left (Available fields) and select all three fields to add them to the template.
You will see that the resource name (in this case “Assignments”) is automatically added in front of the field name.
4. Add Additional Resources via Resource Mapping
Fields are distributed across multiple databases (resources), and sometimes not all required fields are available within a single resource. With the help of resource mapping, relationships to other linked resources can be activated, and their data fields will then appear on the left under "Available fields".
Important: Data fields from linked resources should only be used as additional information and not as filter criteria.
How to Activate a Relationship to Another Resource:
- Click the Button "Edit Resource Map".

- The resource mapping opens. Activate the relationship by clicking on the desired resource. After activation, a new resource appears to the right of your original resource.

For our example, we connect the existing resource Assignments with the resource/databas "Assignment Employee" via Resource Mapping in order to access the names of the employees who were planned during the selected period.
To do this, open the resource mapping (Edit resource map) and activate the relationship to the resource "Assignment Employee" by clicking on it. - In the newly displayed resource on the right, you can either activate further resources or expand the available fields below and add the desired data fields to your template.

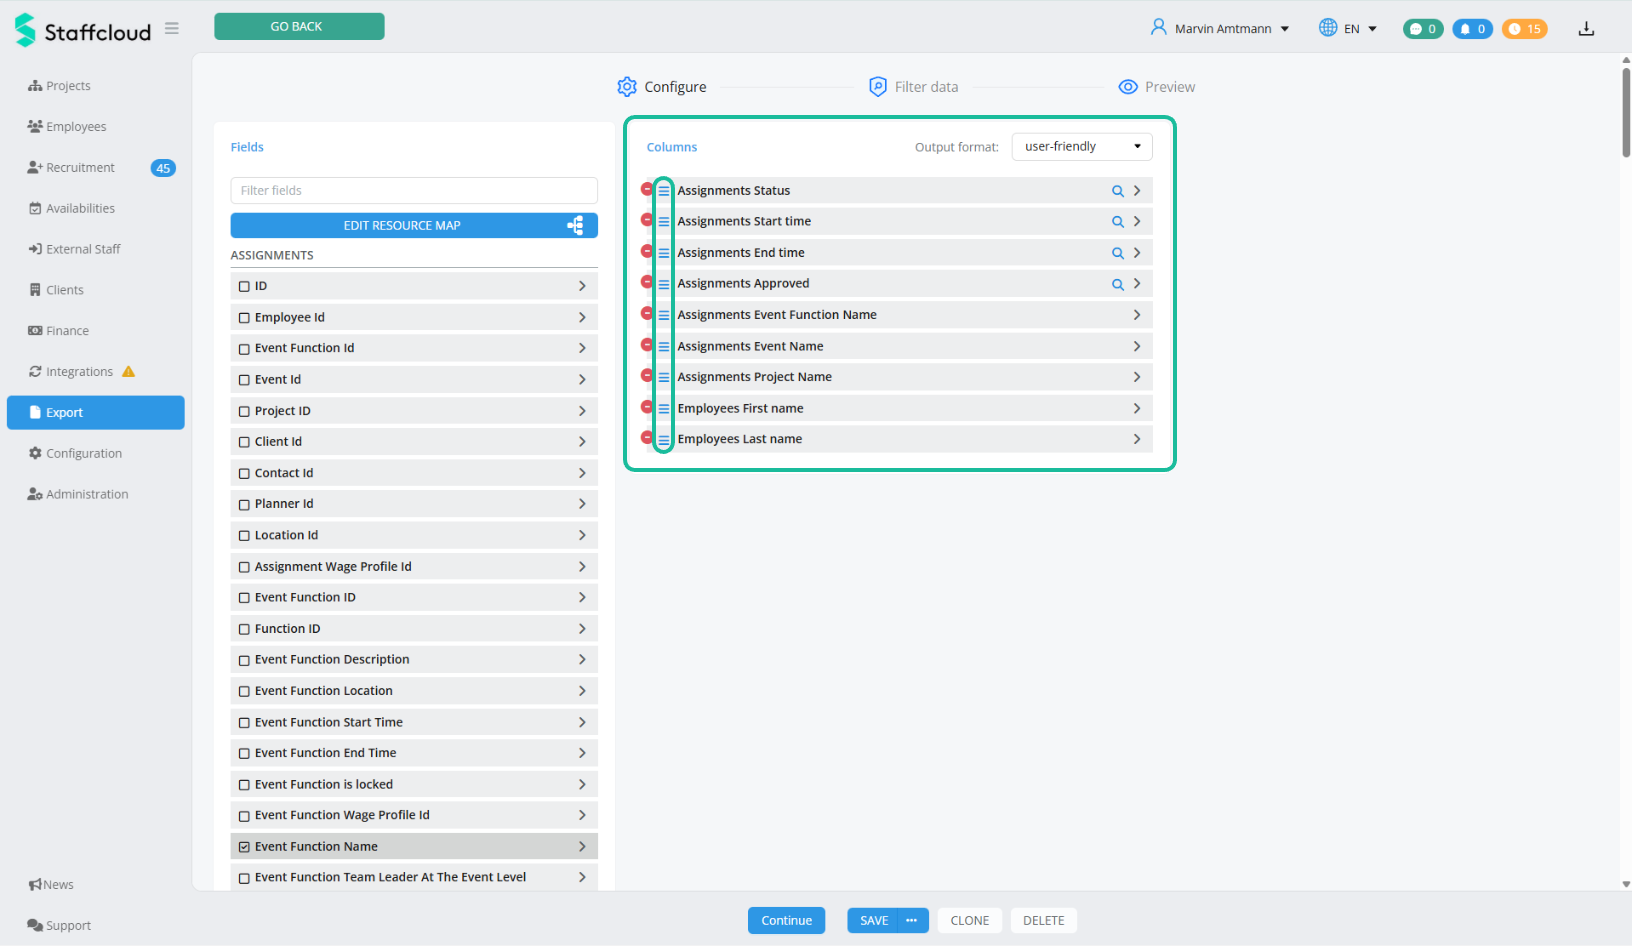
In this example, the fields under the relationship are expanded and the data fields "[Employees] First name" and "[Employees] Last name" are selected by clicking on them.
The field "[Employees] Status", which is selected by default by the system, is not required in this example. It can either be deactivated directly in the resource mapping or removed via the red minus icon in the export configuration overview (middle area: Columns). Repeat these steps until all required fields are selected. Then close the resource mapping.
Your newly added data fields are now listed in the middle area Columns, and the left area "Available fields" has been expanded to include the newly activated resources and data fields.

Detailed Explanation:
In Staffcloud, the resource "Assignments" is linked to the resource "Assignment Employee" via the data field "Employee ID" (Employee Id). By activating this relationship, we gain access to all master data fields of the employees who were planned during the selected period.
It is also possible to activate relationships to other ressources (e.g. Assignment Work Times, Assignment Wages, etc.) if these are required for the export.
5. Select the Output Format
The export configuration offers two output formats: user-friendly and Machine readable. This determines how values are displayed and formatted in the export.

⚠️ The output format is defined once for the entire export template and therefore cannot be configured individually for each data field or column.
The following table shows the output in Excel depending on the selected output format:
| Field type Example-Data fields | user-friendly (recommended) | Machine readable (for API / Integrations and certain Aggregations) |
| DATE & TIME | ||
| date-time (Date and time) e.g. "Assignment Start time" | 05.07.2025 15:00 | 2025-07-05 15:00:00 |
| Date e.g. "Date of birth" | 30.06.1996 | 1996-06-30 |
| Time e.g. "Time of day" | 15:00 | 15:00:00 |
| Duration e.g. "Work Time incl. Break" | 7.25 (= 7 hours 15 minutes) | 7.25 |
CHECK BOXES & CHOICE FIELDS | ||
| Checkbox e.g. "Data Privacy accepted" | 1 | 0 | 1 | 0 |
| Choice (Dropdown) e.g. "Nationality" | Switzerland | 535 (= System ID of the chosen value) |
| Multiple choice e.g. "Qualifications" | Cashier, Bar Lead, Logistician | (empty) |
| Multiple choice with levels e.g. "Spoken Languages + Language Level" | German - Native, English - Fluent | (empty) |
SYSTEM FIELDS | ||
| System Status e.g. "Assignment Status" | Assigned | 6 (= System ID of the current status) |
| System IDs e.g. "Assignment ID" | 264104 | 264104 |
OTHERS | ||
| Money e.g. "hourly wage" | € 20.50 | 20,5 |
| Upload (File upload) e.g. "Upload Passport" | (empty) | 1581 (= automatically applied Upload ID for this document) |
HONORABLE MENTIONS / EXCEPTIONS | ||
| "Assignments Approved" | yes | no | 1 | 0 |
Not all field types show a visible difference in the export depending on the selected output format – the following data fields are displayed identically in both output formats:
- System IDs (e.g. Assignment ID, Employee ID, ...)
- Text fields (Rich text editor, single-line text fields, multi-line text fields)
- Email address
- Phone number
- Decimal (e.g. "body height in meters")
- Index (e.g. "automatically incrementing employee number")
- Number (e.g. "manually assigned employee number")
- Website (URL)
- Colour codes
Please note that the formatting shown (e.g. in Excel) is primarily influenced by your personal regional and program settings on your device. This also applies to the decimal separator (comma or dot). The settings recommended by Staffcloud can be found here: [Article still in progress]
In this example, the output format user-friendly is selected.
6. Reorder Columns if Required
By clicking on the menu icon of a data field and holding down the mouse button, you can freely reorder the data fields (= columns). You can remove a field from the template using the red minus icon next to it.
In this example, the columns are reordered as follows:

7. Configure Columns & Filters (Search form)
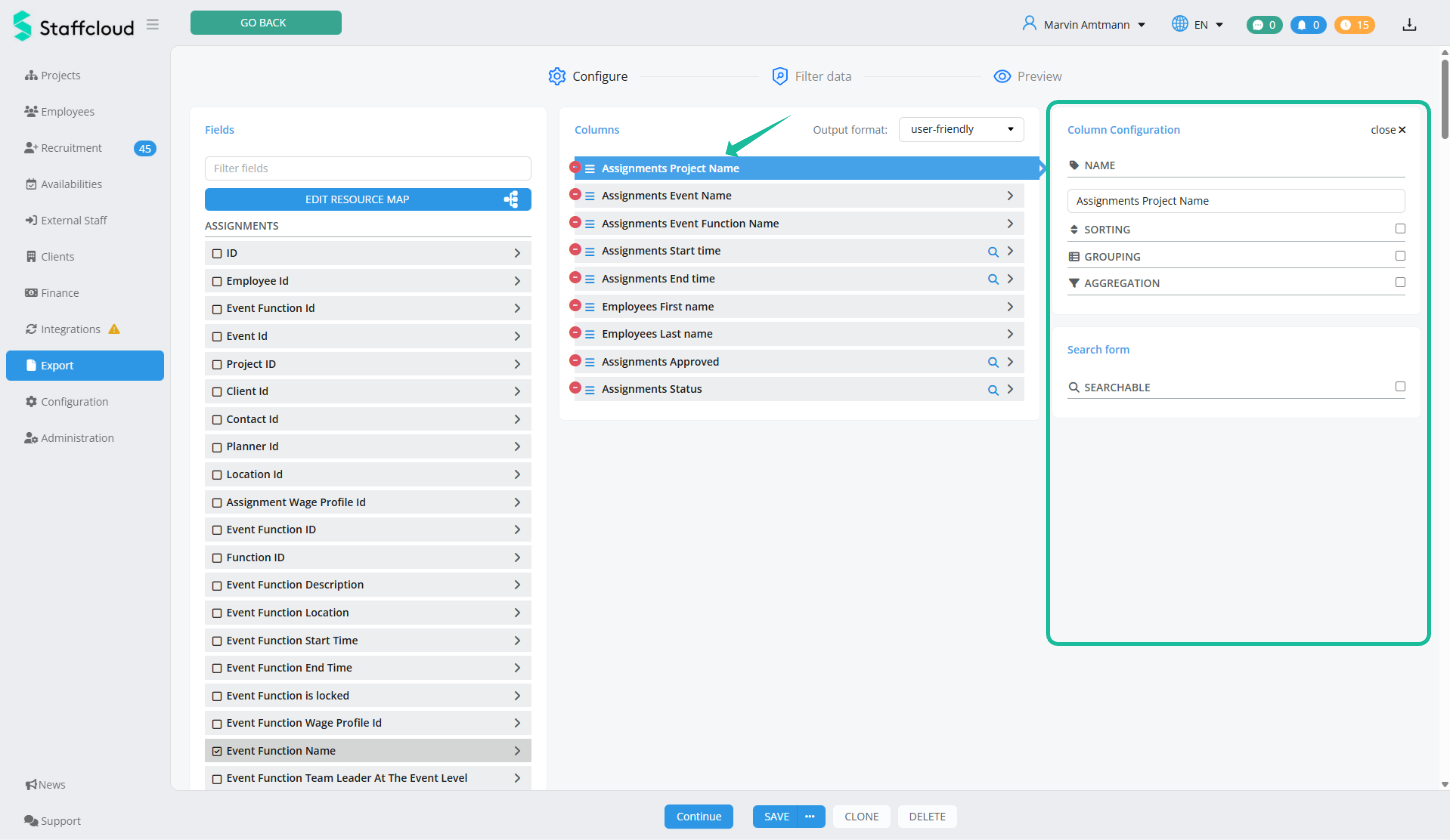
When you click on a data field (column), the areas Column configuration and Search form open on the right.
Column Configuration
When exporting data, Staffcloud offers several options to make the output clearer, more structured, and more meaningful. The three central functions are Sorting, Grouping, and Aggregation.
They allow data to be ordered, aggregated, and analyzed—for example by defining a specific order, grouping similar values, or calculating sums and averages.
Change Column Name:
At the top right of the column configuration, you can edit the column name. The name entered here will be used as the column header in your export.

In this example, the column names were renamed so that the resources [Assignments] and [Employees] are no longer displayed in the column names.
Additionally the following names were changed:
- [Assignments] Start time → Start
- [Assignments] End time → End
- [Assignments] Status → Planning Status
- [Assignments] Approved → Approved
Advanced Column Configuration:
For more advanced column configuration (multi-level sorting, grouping, aggregating), please see the this Article: Creating Export Templates: Column Configuration
Create Filters (SEARCHABLE) in the Search form - More Meaningful and Faster Results
When exporting a finished export template in Staffcloud, the filter screen always opens first.
To see only relevant results in your export, Staffcloud allows you to pre-filter the data. This ensures that you do not export all entries every time, but only those you currently need—saving time in further processing and system resources.
To define a data field as a search field (filter), click on the data field in the middle area and activate the SEARCHABLE checkbox on the right under column configuration. The filter is now active, and the filter configuration for this data field opens.
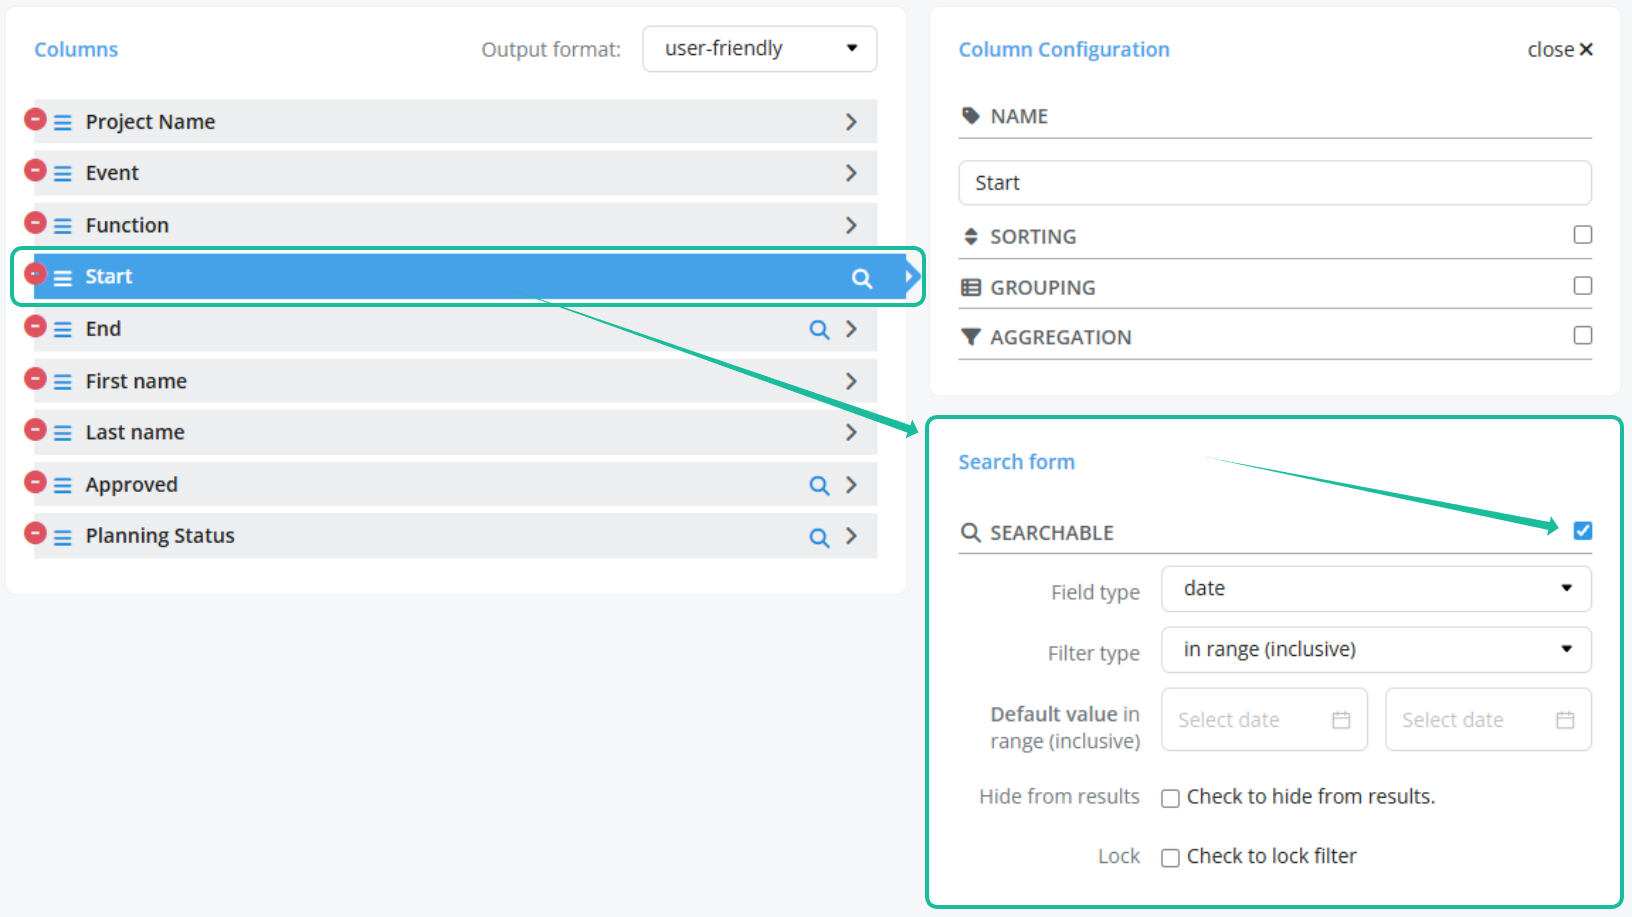
In this example, the filter for "Start" (= "[Assignments] Start time") is configured so that the date (excluding time) can be limited before exporting.
- Field type: date - The data field "[Assignments] Start time" is technically a date-time field. Since filtering date-time fields is not very user-friendly, Staffcloud allows selecting date instead of date-time.
- Filter type: in range (inclusive) - This filters all assignments that start within the specified period (from – to).
If you deactivate the checkbox again, the filter is also deactivated.

In this example, the filters for "End" (= "[Assignments] End time") and Approved (= "[Assignments] Approved") were removed. We only want to filter by assignments that start within a specific period and are assigned or confirmed. However, the assignment end and approval status should still be displayed in the export.
The data field Planning Status (= "[Assignments] Status") is already configured by default to filter assignments with the status Assigned or Confirmed. This is optimal for the example export and is therefore kept.
Advanced search field and filter configuration:
Which types of search fields and filters you can define, and what the different field- and filter types mean for the search form, is explained in this article: Creating Export Templates: Search form Configuration
8. Preview Export & Save Template
To ensure that all required data fields have been added and the export template is correctly configured, you can preview and test the data via the export preview. Click Continue in the action bar at the bottom.

In the next step Filter data, you will see the previously configured search form on the left. Enter the desired parameters and click SEARCH.
If the export template, columns, and filters are correctly configured and the queried data volume is not too large, you will see the results after a short wait. Each applied filter appears as a column, and each result appears as a row.
In this example, we filter by:
- Start: 01.07.2025 - 31.07.2025 (choose a time period where assignments took place in your instance)
- Planning Status: Assigned & Confirmed
After clicking SEARCH, in our case 360 results (rows) appear on the right. The two filters "Start" and "Planning Status" are displayed as the two columns.
To see the full results, click Continue to go to the (full) Preview. On the next page, click Preview at the top left to refresh the view.

You can now review the result. If adjustments to individual columns are still required, you can make them directly in this view by clicking on the column name - the column and filter configuration will open on the left side.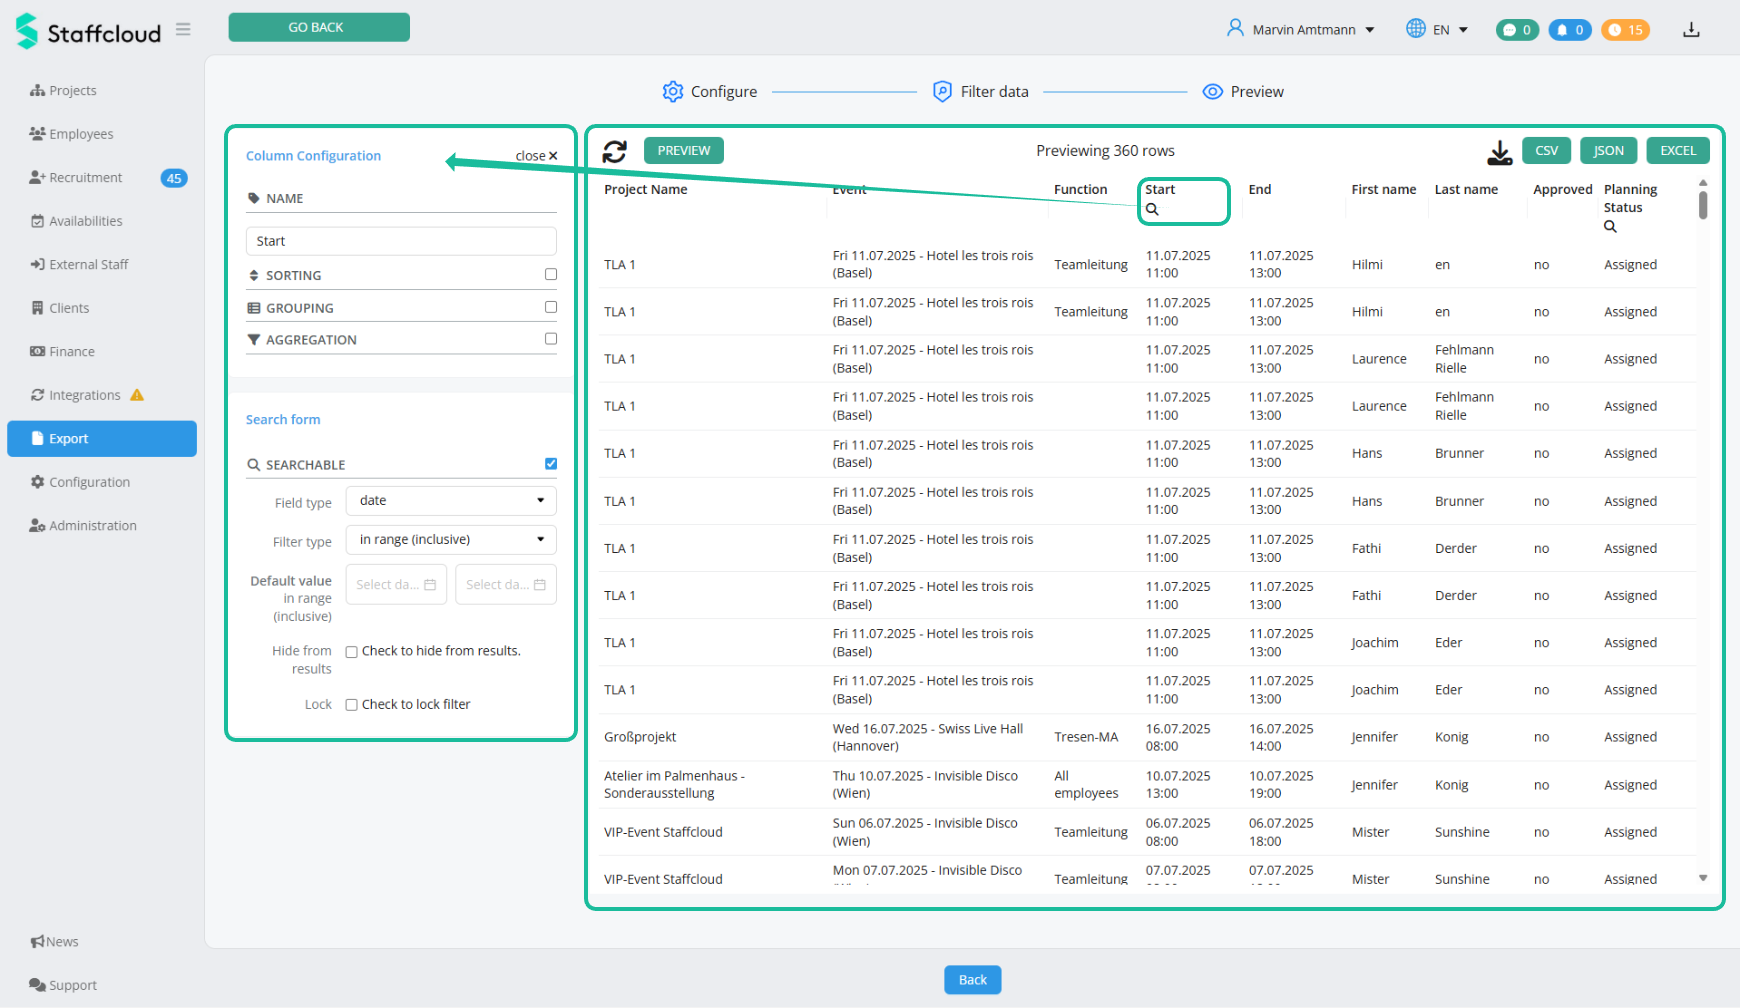
If you are satisfied with the result, you can download it directly as a .CSV, .JSON, or Excel file using the buttons at the top right.
To return to the original export configuration, click "Back" in the action bar at the bottom until you reach the first page again, or click "Configure" at the top.
9. Name and Save the Template
If you are satisfied with the export template, click Save in the action bar to open the save popup.
Give the new template a meaningful name and click Save again. The name alone should immediately make clear to the user which information can be exported with this template.
Context: None
What context means in this case, and how you can embed export templates into specific areas such as the team sheet, is explained in this article: Direct Export: Configure an Embedded Export Template

In this example, the export template is named “Assigned employees within period”.
Congratulations! Your new export template is fully configured and safely saved!

Related articles:
Creating Export Templates: Column Configuration
[WIP] Creating Export Templates: Search form Configuration
Direct Exports: Using Embedded Export Templates
Was this article helpful?
That’s Great!
Thank you for your feedback
Sorry! We couldn't be helpful
Thank you for your feedback
Feedback sent
We appreciate your effort and will try to fix the article